SD Card Software updates
- Liam Mackie
- William Pascoe
- Stephen Farrell (Unlicensed)
- Nicky Williams
Owned by Liam Mackie
Last updated: Jan 16, 2023 by William Pascoe
TouchOne
TouchOne Firmware Update SD Card Tool
| Name | PhoenixCard |
|---|---|
| Description | A tool that creates bootable SD Cards to flash the TouchOne with new firmware |
| Version | 3.0.9 |
| Platform | Windows |
| Download Link | TBC |
Intercom
Bosch PDV-2000 Private Door Station
| Name | PDVTool |
|---|---|
| Description | Tool to configure settings for Bosch PDV-2000 Private Door Station |
| Version | 570 |
| Platform | Windows |
| Download Link | Download |
How to flash an SD card for TouchOne update
Requirements:
- A MicroSD card.
- A computer with an SD card reader.
- If your computer only has a standard sized SD card slot then you will need an SD card adapter.
- If the computer does not have an SD card reader at all then you will need an external SD card reader that connects via USB.
- A Windows computer.
- If you do not have a Windows computer you can use a Virtual Machine with Windows.
- Alternatively, you can use different software compatible with Linux or Mac OS.
- PhoenixCard utility (or alternative for your Operating System).
- Available here: PhoenixCard download.
Preparing the MicroSD card:
- Insert the MicroSD card into the SD card reader.
- Go to “Computer”, or “This PC” and locate the MicroSD card.
- Backup any files on this SD card that you wish to keep as this process will format the SD card.
- Download the firmware image (hyperlink to download) to a directory that is easily accessible, like the desktop.
- Download PhoenixCard.
- Extract the zip folder to a directory that is easily accessible.
- Start the PhoenixCard application.
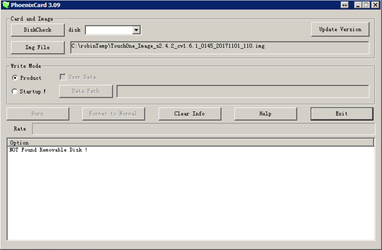
- Click “DiskCheck” and choose the drive that is the SD card.
- Click “Img File” and choose the firmware image.

- Set Write Mode to “Product”.
- Click “Burn”.
- Once the burning process has finished, eject the SD card from the computer.
Flashing the TouchOne with the updated firmware:
Please ensure that you only use a Gen 1 image with a Gen 1 TouchOne, a Gen 2 image with a Gen 2 TouchOne, and a Mini image with a Mini TouchOne.
- Disconnect power to the panel.
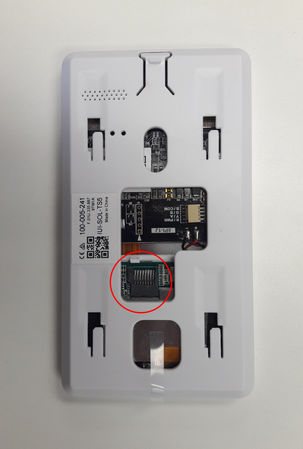
- It is recommended that you remove the TouchOne from its mount to gain better access to the MicroSD card slot on the back of the device.
- To do this press in the tab on the end opposite the camera, then slide the TouchOne in the direction of the camera.
- You will see the MicroSD card slot on the end with the camera.
- Insert the MicroSD with the gold connections facing towards the screen. Push until it clicks into place.
- Reconnect power, a progress bar will display on the TouchOne.
- Once the process is complete, disconnect power once more and remove the MicroSD card.
- Reconnect power to the panel again, allow a few minutes for the updates to be installed.
MicroSD card slot locations:
Gen 1
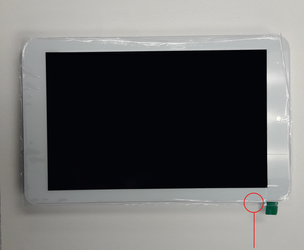
Gen 2
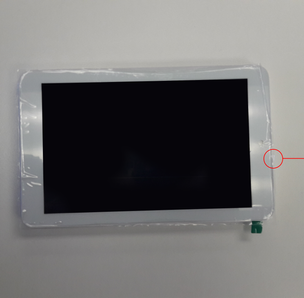
Mini
| TouchOne | Download |
|---|---|
| 7 inch - Gen 2 | Image |
| 5 inch - Mini A1 | Image |
| 5 inch - Mini A2 | Image |
7 inch - Gen 1 Note: Please do not use this to update devices with Rev F hardware (8PI-1F) | Image |
, multiple selections available,