How to physically install the TouchOne
- William Pascoe
- Nicky Williams
Physical Dimensions
7 inch = 195mm x 177mm x 13.6mm
5 inch = 145mm x 80mm x 13.6mm
Tools and supplies to carry:
- Phillips head screw driver
- Wire cutter/stripper
- 5mm cable
- If you are installing more than one TouchOne
- 12V DC 1500mA Power Adapter – Model: 18J120150P
- Accompanying female DC Plug 2.1mm Screw Terminals – SKU: K3706-F21
Note:
Please ensure that the TouchOne is receiving a minimum of 10.5V, voltage levels below this may result in the TouchOne shutting down during power intense tasks.
Installation:
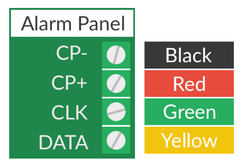
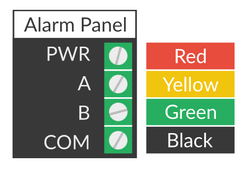
Using the included Wire Harness, wire the TouchOne into the control panel as per the diagram.
Classic Panel:
Solution 2000 / 3000:
It is recommended to solder the wires to the cable from the control panel.
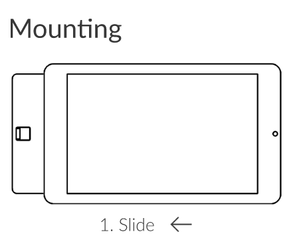
The 7 inch TouchOne can be mounted in two orientations, either portrait or landscape. The TouchOne mini must be mounted in landscape orientation. The wall mount should be screwed onto the wall first using the included 6G x 20mm pan head screws. If you want to install the 7 inch TouchOne in portrait orientation, then the circle screw hole should be on the bottom, and the oval screw hole on the top. Plug the Wire Harness into the TouchOne.
Aligning the Generation 2 and Mini TouchOne to the wall panel Wall Mount’s hooks, it should move closer to the wall when aligned correctly. Slide the TouchOne in the opposite direction of the camera until you feel it clip. Ensure all wires are fed into the wall.
To mount the Generation 1 TouchOne simply apply equal pressure across the touch screen until you feel it clip into place. Check that all the sides are in place.
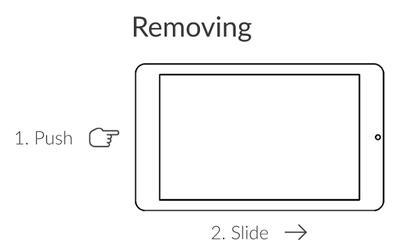
Removing the TouchOne from the Wall Mount:
The Generation 2 and Mini TouchOne are removed by pressing the clip that is located on the back at the opposite side of the camera. Using a finger or small screwdriver, push the clip towards you and slide the TouchOne in the direction of the camera.
To remove the Generation 1 TouchOne from the Wall Mount, you will need to use a small screwdriver and insert it into the small cut outs on the right-hand side to the camera. This will lift the touchscreen away from the mount. Slowly insert the screwdriver around the edges to lift them away. This will eventually lift the TouchOne out of the Wall Mount.
Installing external power supplies:
When installing more than one TouchOne, all TouchOne’s except one must be powered with external power supplies.
The red wire from the Wire Harness connects to the positive terminal. You will need to cut a piece of 0.5mm wire to connect from the negative terminal to the COM terminal on the control panel. The black wire from the Wire Harness will also need to go to the COM terminal. The rest of the wiring is as per the original.
Before powering up the TouchOne running off of the external power supply, you will need to set up the areas in the control panel, then address the TouchOne’s and/or keypad as required.